Basic Gear Guide
Most of the information below was graciously provided by Simpawtico Dog Training with their permission.
Visit their site at https://www.simpawtico-training.com/
Safety Information and Legal Disclaimer
The equipment and methods described herein are to be used under human supervision. Keep equipment out of reach of children. Always inspect gear for any damage before each use; do not use if damaged. Consult your physician/veterinarian before you/your dog start this or any exercise routine. Operation Good Dog cannot be held, in any situation, responsible for any harm (physical or mental) caused by the use (or improper use) of these products or training methods. All of the products listed in this guide are used at your own risk. Learn the proper ways to use the tools listed herein from a trained professional. Understand that working with a dog is not without inherent risk to yourself and others. You assume all risks involved.
Leashes
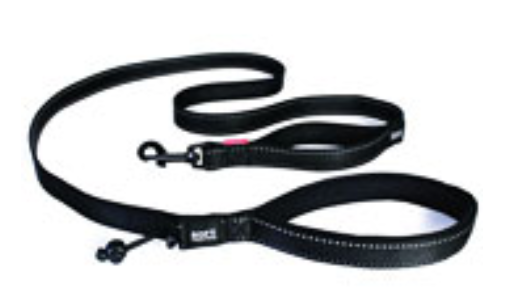
Leashes are among the most important items for keeping your dog safe and teaching basic skills. It’s usually one of the first things someone buys when they get a new dog. Once you learn how to use a leash effectively, it really becomes a powerful communication tool.
When I’m selecting leashes I look for five main characteristics:
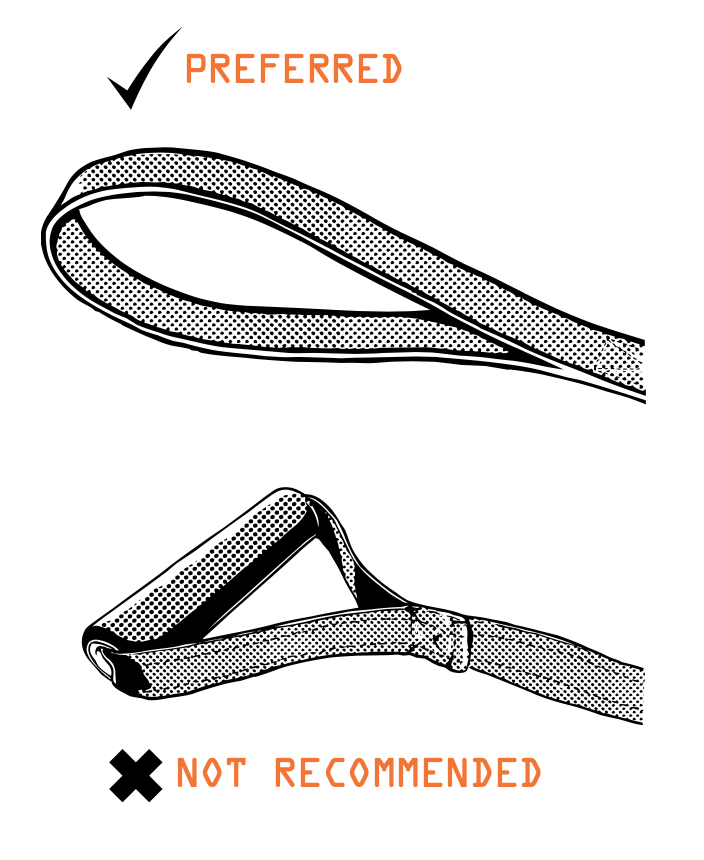
I want a loop-handle on one end. That’s an easy one because just about every leash in the world has one of those. However the loop has to be slim enough to fit on my thumb. Some leashes have great big, padded loops and these just get in the way, in my opinion.
I want it to be well made. I don’t have time for crap. I want my dollar to go as far as it can, and I want gear that will stand up to the wear and tear of daily use.
I want it streamlined. I don’t like bulky gear with hokey features that just slow things down.
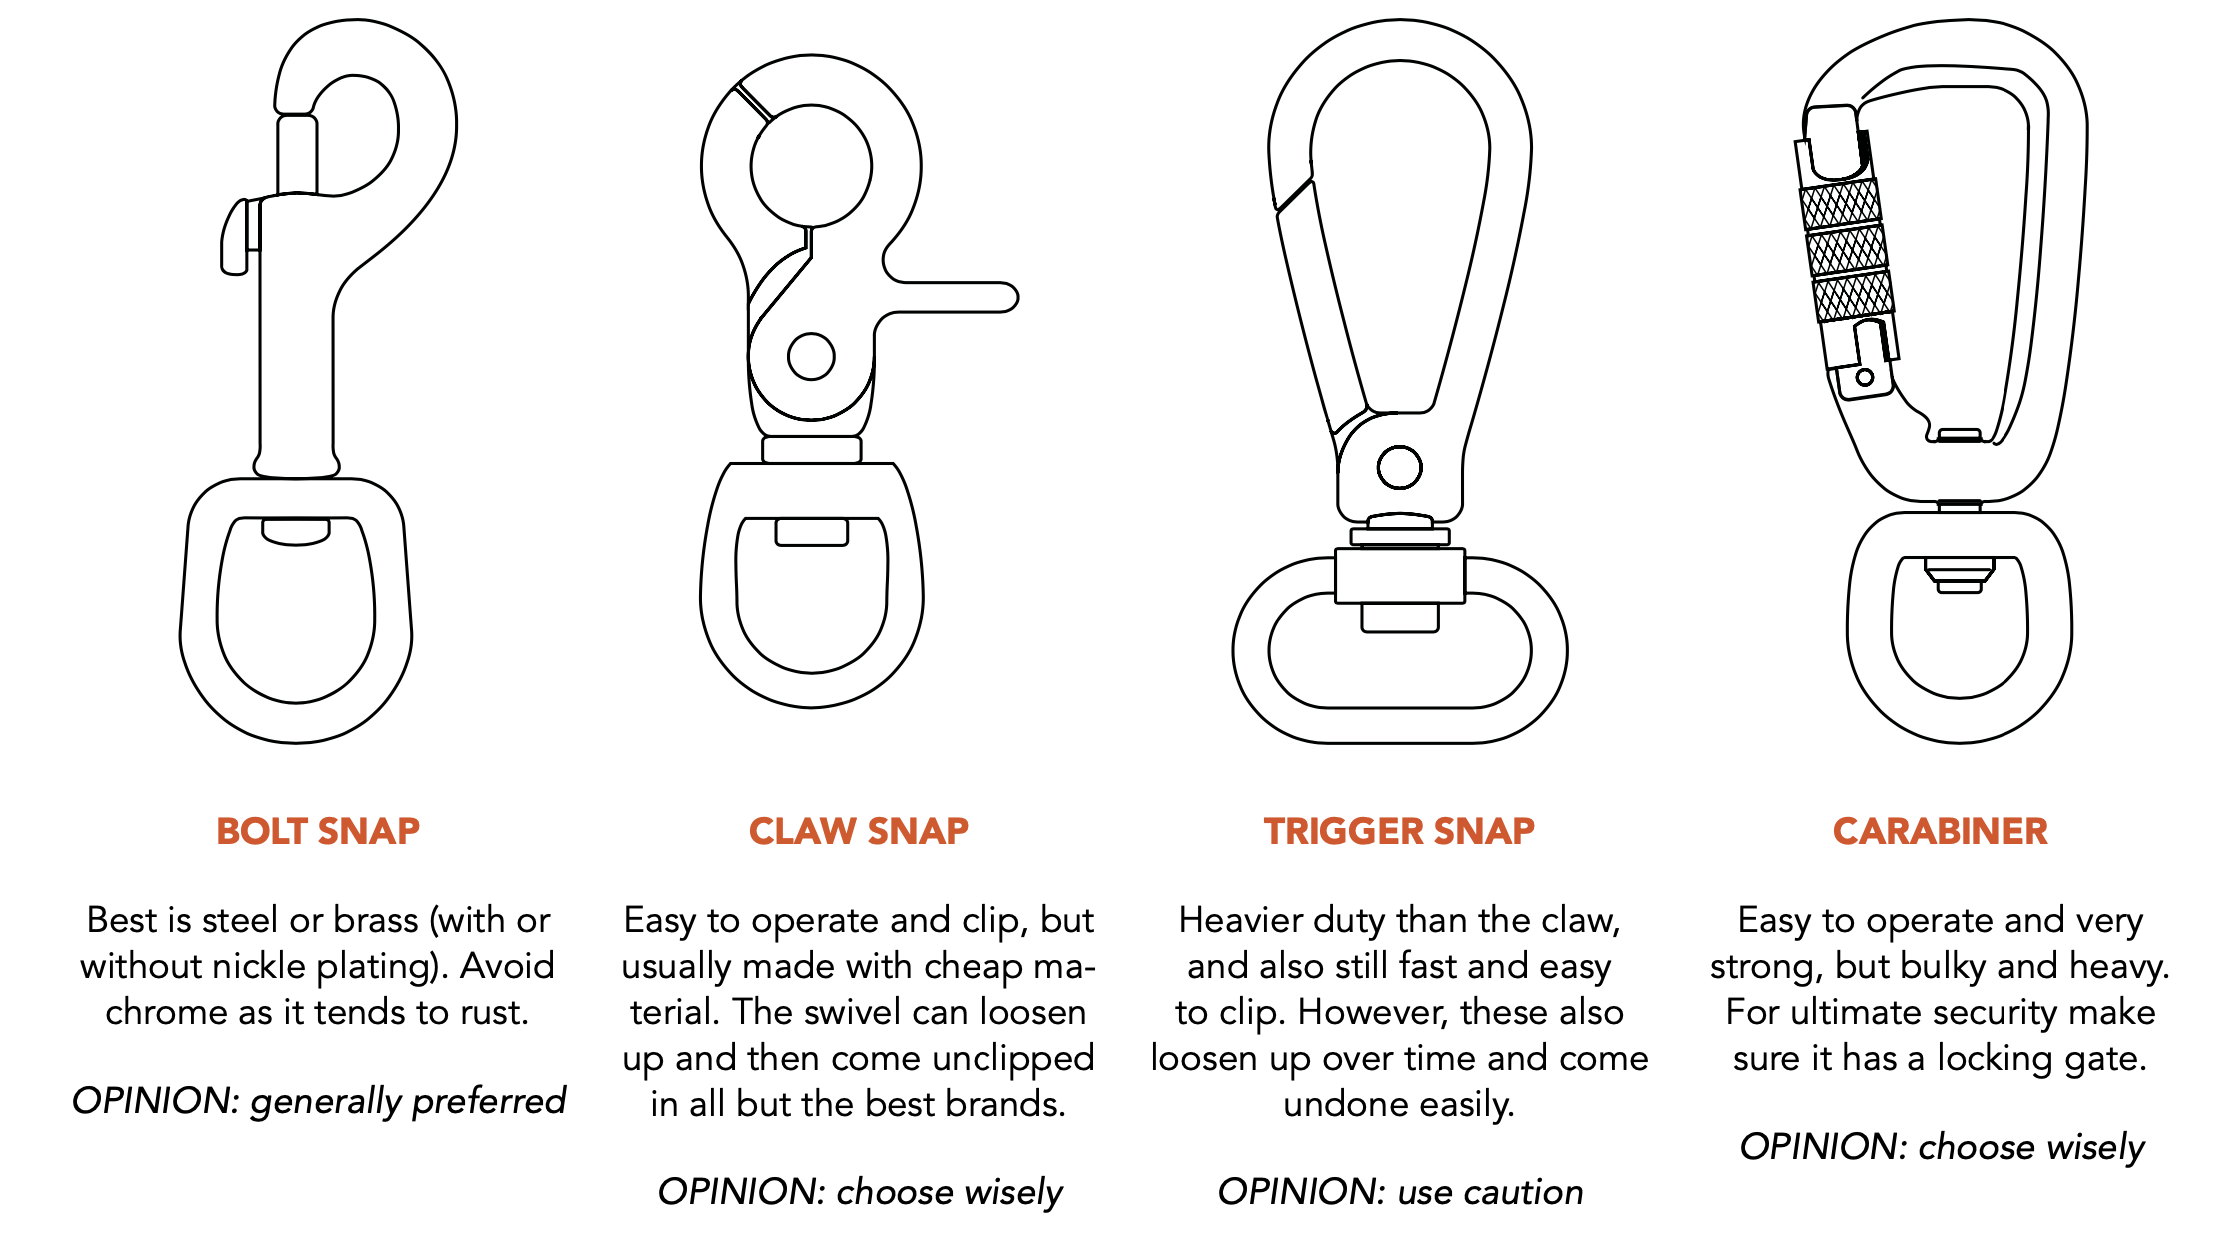
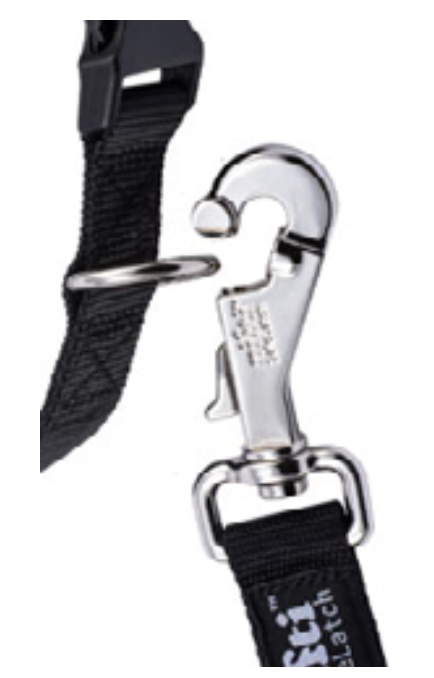
A well made snap. Standard bolt snaps are usually preferred, but anything else has to be strong, safe and easy to manipulate.
I like comfort; I’m not ashamed of that.
A Note About the Handle
We really recommend a loop handle over any other kind of handle. Based on our training system we teach dogs how to walk with a loose lead and we also teach our students how to handle a leash like a multi-tool. You'd be surprised at all the different ways you could use a standard, no-frills leash. The more add-ons there are the more of a unitasker it tends to be. These extra features usually just get in the way. We prefer a leash that can be used in a great variety of potential situations.
For this reason, we do not recommend ski-handle leashes. This kind of leash will only be useful for keeping control of a really bananas dog, but this has to be a short term solution if you use it. If your goal is to eventu- ally get your dog to walk politely with a loose leash (and you should) then ski-handle leashes won't really be part of your long-term training plan.
A Note About Snaps
Think about your snaps as you purchase also. A standard bolt snap is adequate for almost all situations, especially if it’s steel or brass. You will encounter other configurations, but I prefer standard snaps in most cases. Consider these pros and cons:
Leather Leashes
It's hard to beat a good, leather leash. There's a reason it's a staple with trainers of all stripes.
Although nylon is technically stronger, leather tends to resist wear better. Leather is also very comfortable and just gets softer over time without losing any strength.
Leather Snap Attachments
There are three main types of attachments for leather leashes to the connector: braided, riveted, and stitched.
Generally the attachment is going to be one of these three, although you can find some that combine two of them, e.g. braided and then stitched, or braided and riveted. Although these are typically stronger (and more expensive) a good quality brand will stand up even it if’s only one of these types.
Defects and damage will always happen. Some trainers have had rivets pop out. Stitching can fray. Braiding can squish together. I’ve personally never had any problem with any of these. As usual your mileage may vary and your experiences with your dog will be your own. Choose wisely.

Mighty Paw Distressed Leather
Attachment: riveted
Sizes: Lite (1-30lbs) 5’ long, 1/2” wide Regular (30-100lbs) 5’ long, 3/4” wide
Colors: black, brown, or light brown
Cost: ≈$20 USD
REVIEW: I’ve included this one as the most affordable leather leash that still has good quality to it. Most leather leashes are a bit more spendy, but this is a good one to get into leather with. It’s well made and soft, nice and smooth. The Lite version would work well for small to mid-size dogs; the regular is big enough to work with a wide range of larger dogs. My only gripe with this is that they only come in five-foot length. I personally prefer six, but I’m just splitting hairs. For most of you out there this will be great.
On a side note, I do not recommend Mighty Paw’s other leather leash, the 6-foot padded handle. There’s no lock on the carabiner gate, the accessory ring isn’t free-floating, and for the price you can do better.

Leerburg Amish Latigo Leather
Attachment: riveted + stitched
Sizes: 4, 6, and 10 foot
Colors: 3 options
Cost: ≈$35-$47 USD, depending on size
REVIEW: Handcrafted from Amish-made latigo leather. Leerburg is a pro- training site so there are tons of configurations that the average dog owner won’t need. Still, very good quality stuff, albeit a bit more pricey. I have two of these, too, and I love them. Unbelievably tough and well made, this is a lifetime leash, for sure.

Dean & Tyler Love to Walk Dog Leash
Attachment: braided
Size: 6’ long, 7/8” wide
Color: brown, black
Cost: ≈$55 USD
REVIEW: Hands down, this is my favorite out of all of my leather leashes. It’s pricey, but I love it so much. It’s smooth, supple, easy to handle, and it’s tough. From mid-size to giant breeds I’ve used this on all of them. Although the price originally made me balk, this is a leash that you’ll use your whole life. Buy it once, and that’s it.

Nylon Leashes
As I mentioned, nylon is technically stronger than leather; the tensile strength is way higher. Nylon also gives you the option of integrating reflective materials for nighttime which is nearly nonexistent in leather. Finally, nylon is much lighter than leather and some people prefer an ultra-lightweight leash.
Nylon, however, does not resist wear and tear like leather does. Sharp corners, nibbles from the puppy, getting shut in car doors...nylon won’t stand up to the world like leather will. So, there are tradeoffs.
In any event, for nylon there are countless adequate leashes out there. PetSafe’s $8.00 leash is good enough for most dogs. Bluberry Pet makes a couple of good ones too. But my favorites are...
EzyDog Soft Trainer
Sizes: Lite (dogs under 26lbs) 6’ long, 1/2” wide Standard (dogs 26lbs and over) 6’ long, 1” wide Colors: 8 options
Cost: ≈$20-$30 USD, depending on size
REVIEW: This is a great, basic leash with good functionality in the features (without overloading it). The handle has neoprene lining making it comfortable to hold in different configurations. The nylon webbing is reflective for low- ligh/nighttime, and there’s a traffic handle at the bottom. I used to be all about traffic handles but recently I realized I hardly ever actually used them! They’re good to have in a pinch for certain dogs, but if you’re going to have one it had better be low-profile so it doesn’t get in the way. This fits the bill nicely.
Finally, I know I said I didn’t like a ton of features, but there is a barrel lock accessory attachment that’s not bad for pick-up bags or a small light. This, also, is low-profile so it’s out of the way unless I want to use it (as it should be).
Nifti Safelatch
Size: 6’ long, 1” wide
Colors: 5 options
Cost: ≈$25 USD
REVIEW: OK, I know I said that a basic bolt snap is the way to go, and this technically is a bolt snap, but it’s been suped up for the 21st century, and I LOVE IT. Nifti has added three things to the bolt snap that make it better: 1) The thumb release is bigger and easier to manipulate; 2) The bolt has a recessed hole for the tip to slide into making a stronger, completed loop; 3) There’s a strong magnet inside the snap that pulls the ring from the collar or harness into the loop and keeps it there.
This is a really cool design and the snap is well made. Usually I hate gimicky stuff but this is well-designed and it works.
Biothane Leashes
BioThane is essentially a polyester webbing with a TPU (thermoplastic polyurethane) or PVC (polyvinyl chloride) coating that makes it more durable, stronger, and easier to maintain. It’s waterproof, smooth, and extremely strong. Many BioThane leashes have been tested at breaking strengths in excess of 750 pounds.
Tiger Tail Urban Nomad
Sizes: Obedience 4-foot Standard 6-foot
Colors: 6 options Cost: ≈$35 USD
REVIEW: The Urban Nomad is their base model and it’s a super leash. It’s everything I like in a leash: super strong, streamlined, smooth, and easy to work with. This is one of my dog’s permanent leashes now whenever we walk her.
Tiger Tail chose to use the Claw Snap on their leashes. Initially I was kinda wary of this, but when I inquired about it, Tiger Tail owners Matt and Shane (swell guys, BTW) assured me they’d shopped around to find the best. So far, it hasn’t failed me and seems to be holding up.

Tiger Tail Wild Grip
Sizes: Obedience 4-foot, with or without loop handle Standard 6-foot, with or without loop handle
Colors: brown, black Cost: ≈$50 USD
REVIEW: This is Tiger Tail’s heavy-duty BioThane leash. It features a wicked, knobby texture with endless grip power. I have to admit I wasn’t too sure about this one until I tried it on a huge and powerful dog that came in for lessons. This leash was SUPER. This now hangs on a peg in the training studio for quick access. If you’ve got a mentally and/or physically strong dog this will make all of your handling more successful.

Leerburg Biothane
Sizes: 4, 6, and 10 foot
Colors: black, orange
Cost: ≈$20-$27 USD, depending on size.
REVIEW: This is a good leash, there’s no doubt. It’s an exact copy of the leather Leerburg leash, only in BioThane. I personally don’t like the variety of BioThane they used on this one as well, in comparison to the Tiger Tail leashes. That said, I used it a lot one winter and it was a great tool to have.

Collars
In this section I won’t make too many specific product recommendations. Mainly I want you to understand what’s out there and make an informed decision when you purchase.
Also, I won’t get into the merits or detriments of training collars, such as prong collars or chokers. This also in- cludes dominant dog collars, slip leads, and even electronic collars. Any training device is an extremely sensi- tive tool. It is our professional opinion that, no matter what your experience level is with dogs, get a pro-trainer involved to advise you on what tools to use, when to deploy them in your training progression, and even if you should use tools like these.
Basic Collar Types
Buckle Collars use the standard prong and hole setup like a belt buckle. This is stronger than a plastic snap, but usually doesn’t size as accurately as it should.
Snap Collars allow for more accurate sizing. Plastic snaps fail more often than buckles, but should be fine for most setups and dogs. Metal snaps are super reliable, but heavier.
Martingale Collars are typically sold as a corrective collar, but this is neither what they were made for, nor the appropriate use for them. Their dynamic resizing was made for dogs with necks bigger than their heads, most notably sighthounds like Greyhounds and Whippets, and bully breeds. We use martingales on all of the dogs at the shelter because you can slide it on/off over the head and still have a very secure fit for walking them around the surrounding woods. In my opinion a martingale is a solid choice for any dog. If you’ve been reluctant to train on a collar because your dog bucks their head out of regular collars, this is a very reliable and safe solution.
Once again, martingales are not corrective collars and were never meant to be. If you want to use a corrective collar, get one designed for that kind of work and do the job right; don’t half-ass it by trying to use a martingale.

Pro Tip: Fit Your Collars Correctly
In my experience, most owners have their collars way too loose. Most people feel like a properly adjusted collar looks too uncomfortable for their dog. However, a sloppy collar tends to make things more uncomfortable for your dog, and terribly inefficient. Here’s our rule of thumb:
For mid-size to large dogs, you should just be able to slide two fingers under the collar.
For small dogs, one finger should be able to slide under.
Collar Recommendations
Ruffwear Web Reaction Martingale
Sizes: 5 options
Colors: 4 options
Cost: ≈$20 USD
I would discourage getting a martingale with a chain loop. I recommend that the loop just be the same material as the rest of the collar (usually nylon). In this case, the whole collar is made from Ruffwear’s Reflective TubelokTM webbing. It’s colorfast and long-wearing. This one has a sturdy side-release buckle for easy on/off. There’s a an aluminum V-ring for the leash attachment point, and a separate ID attachment point (which includes a silicone tag si- lencer).
Ruffwear quality really can’t be denied. I personally am not a fan of their color choices, but that’s just me and my dark sensibilities, LOL! I’m sure there are options to satisfy most people if this collar appeals to you. In any event, it’s a solid and safe choice for any dog that slips out of regular flat collars.

Petsafe Slip-On Martingale
Sizes: 6 options
Colors: 5 options
Cost: ≈$7 USD
REVIEW: You don’t really need much more than one of these, unless you want something more stylish. This is your basic, no-frills workhorse. It’s super inexpensive and it’s consequently the very one we use at the shelter all of the time.
This style does not have a snap, so it’s the strongest and most reliable ver- sion. That also means you’ll have to find that middle ground where it slips over the head but isn’t too loose when it’s on. After you slip it on over your dog’s head you can adjust the final fit. Because of the limited-cinch, you don’t need it fit as snugly as a regular flat collar; you just need it to not come off.
Good rule of thumb: don’t make the fit so tight that the ends of the main collar ever touch when the cinch is ac- tivated.
I’d love to see a martingale with a metal snap, but I have yet to find one. If you see one somewhere, let me know!

Tiger Tail Urban Nomad Collar
Sizes: 2 sizes (lots of adjustability)
Colors: 6 options
Cost: ≈$30 USD
REVIEW: This is the companion collar to Tiger Tail’s Urban Nomad leash. It’s offered in the same BioThane material and comes in identical colors. The snap on this is plastic, but it’s one of the stoutest snaps I’ve ever seen. This is one I’m not worried about.
As much as I like the metal-snap collars below, one thing that annoys me is the small leash-rings on them; they’re kind of a pain in the neck to connect to. The Tiger Tail has a big D-ring that makes it super easy to do one-handed. These are also very easy to maintain and keep clean (and if you’ve ever owned a bulldog, you know this is very important).

Ruffwear Top Rope
Sizes: 3 options
Colors: 4 options
Cost: ≈$30 USD
REVIEW: A top-quality collar with a metal snap. Also features a separate ID tag attachment point with tag silencer, strong and comfortable webbing, and an aluminum V-ring to clip to. Integrated reflectivity keeps dogs visible in low-light conditions.

Mighty Paw All Metal Hardware
Sizes: 3 options
Colors: 2 options
Cost: ≈$15 USD
REVIEW: This is currently what our Bulldog, Dexter, is wearing. It doesn’t have as much padding as the Top Rope collar above, but it’s a solid piece nonetheless.
Reflective stitching and a titanium d-ring in addition to a smaller, plastic d-ring for the tags (similar features to the Top Rope) help this one stand out.

Harnesses
Walking Training
When we’re training a dog to walk on a loose lead, we train them on their collar in a neutral environment and we teach them not to pull on the collar. That process takes a good deal of time, though, and so we’ll need to move our dogs around the world in the meantime—to the vet, to the groomer, to training school—and in those instances you’ll put your dog on a harness and it’s ok if they pull into the harness because it won’t interfere with your work on the collar.
That being said, that’s our primary model and it works for most dogs. Some dogs, however, just cannot have a collar on at all. We had a student once with a cracked trachea and it was no collar for that pup, ever. For these dogs, a harness is a lifelong solution.
Also, for very small dogs (like toy breeds) a harness is still probably the best solution. Like we mentioned previously, this is safer for their tiny bodies than a collar when out in the world.
While there are dozens and dozens of harnesses on the market, we only recommend two basic configurations:
Body Harnesses: These have the main attachment point on the dog’s back, usually around the shoulder area. Al- though these typically make it more comfortable to pull into the harness, they allow the greatest range of motion for the shoulders. These are the best options for athletic activities such as hiking and running, or sports like agility, flyball, or scent detection. Body harnesses are also the ONLY option for car restraint (which we’ll talk about later).
Front-Hook or Walking Harnesses: These have the main attachment point on the chest. These discourage pulling by converting oppositional energy into rotational energy. During the training progression, a strong puller may benefit from one of these. However we really recommend that this is a temporary solution rather than a lifelong one. Long-term use can affect the gait and health of the shoulders. It can also become a dependency which we want to avoid.
Fitting
Identifying the correct size of harness is a matter of measuring your dog’s girth. That is the circumference of the chest at the widest point, usually measured just behind the “armpits.”Use a seamstress’ tape for this.

Harness Recommendations
Ruffwear Front Range
Sizes: 5 options
Colors: 8 options
Cost: ≈$40 USD
REVIEW: This one is our favorite harness hands down.
This is a super-durable and well made piece. It features dual connection points on the back and the front. That means it’s suitable for walking training as a front-hook, AND riding in the car or for outdoors and athletics as a back- hook body harness.
For a body harness, it’s super easy to put on and take off. It features a little pocket to stick ID into if you’re going to leave this on your dog for an extend- ed period (during a camping trip, for example). There’s also a spot on the inside to write your dog’s name and your phone number on.
There are some reflective bits on the top and front for night time walking. You could clip the leash to the titanium D-ring on the back, and a Nite Ize Spotlit (see our accessories section) on the front.
This is one of the highest rated hybrids on the market right now.

Softtouch Sense-Ation
Sizes: 9 options
Colors: 6 options
Cost: ≈$30 USD
REVIEW: This is a really elegant solution. There’s only ONE buckle, so it’s su- per easy to get on and off. Once it’s on and fitted correctly it starts working almost immediately. There’s no “breaking in” period. The connection point is a huge nickle-plated ring, making hook-ups easy. It’s well made and intel- ligently constructed.
Softouch Concepts also makes the Sense-ible harness, which is essentially identical in design except that it has all nylon webbing instead of the softer material on the SenseE-ation. The Sense-ation also has more size and color options. I personally would just recommend the Sense-ation to everyone.

Petsafe Easy Walk
Sizes: 8 options
Colors: 8 options
Cost: ≈$30 USD
REVIEW: The only thing I think puts it below the Sense-ation is that the Easy Walk connection system on the chest uses a Martingale loop. This isn’t necessarily a bad thing, but I think it complicates usage with a hyper dog. It moves around more and I think it gives the system too much play.
Furthermore, they use a second buckle on the back strap. As many times as I’ve tried to explain to people that “the odd color always goes on the bottom,” I see them upside down all of the time. Sometimes people switch back and forth. Oy vey! The Sense-ation only has one buckle so it’s harder to get mixed up. Hopefully you’ll be more savvy!
Admittedly, the Easy Walk is MUCH easier to find. You can order either brand online but if at all possible you should find a retailer that will let you try them on and get the best fit. Deluxe versions of the Easy Walk are available. These have neoprene lining and reflective stitching.

Pro-Tip: Double Hook Your Walking Harness!
Although the front-hook harness is a decent design while you’re working through your Loose Leash Walking pro- gression, it nevertheless can’t be perfect for all dogs. There are just too many different sizes and shapes. Some- times the front connection part starts to slip lower and lower. Then the dog has trouble walking as it binds up on the shoulders, or in worst cases starts knocking against short little legs. This is an easy thing to fix.
Double clip the leash to BOTH your dog’s harness and their collar. This keeps the connection high up so it works better. It also adds a second layer of security, keeping a reluctant dog from backing out of the harness. If this is not possible, then use an Offset Coupler (see page xx) in the same way.
CAR SOLUTIONS
Car crashes are especially deadly to pets. While us humans are strapped in, many pets are not strapped in well enough. Loose pets become missles. Unfortunately, many “car harnesses” have failed crash tests and have even come undone under the stress of a crash. The safest way for a pet to ride is in a crate. The next best way is in the back seat with a rated harness and/or with a safety strap.
NEVER put your pet in the front seat; airbags deploy at 200mph and have killed pets that would have otherwise survived in the back seat.
A crate is the absolute safest way for a dog to ride. The best are heavy duty, crash tested ones, but these get very expensive quickly. Good quality plastic flight crates crates can substitute in most cases. If this is still prohibitive for you then the safest restraint with the least amount of damage is a body harness designed for riding in the car.
EzyDog Drive
Sizes: 3 options
Colors: black
Cost: ≈$100 USD
REVIEW: The Drive Harness is the highest rated car harness on the market today. It conforms to and has passed all relevant requirements for the fol- lowing standards: USA (FMVSS 213) Europe (ECE Regulation 16) Australia (ADR42/04).
It has a “one-time” fit. Once you get it fit correctly it’s a “set it and forget it” thing. It goes on pretty easily and has a rock-solid, magnetically aligned locking system.
Hook up is similarly simple: just feed the seat belt through both webbing handles on the top of the harness, click the buckle into the seat belt of your car and you’re set.
The only downside is that this is an expensive harness. Suggested retail is $100 USD. However, knowing how deadly a car crash can be for a dog, I’m willing to spend that much. How insignificant would 100 bucks seem if your dog died?

Sleepypod Clickit
Sizes: 4 options
Colors: 4 options
Cost: ≈$75 USD
REVIEW: Clickit is Sleepypod’s dog safety harness for the car. Using what Sleepypod calls an “Infinity Loop design,” the harness is engineered to distribute and reduce damaging forces in an accident.
This harness has been crash tested by the Center for Pet Safety, a non-profit group, and is currently their main recommendation. However, the Center for Pet Safety hasn’t done any tests since 2013 that I can find. Since then, Ezy- Dog’s Drive has surpassed this one. Although the Drive is my first choice, this is still a very good, reliable car harness.

Minor Car Options - Restraint Belts
Keep in mind that crash testing looks mainly at catastrophic crashes. Most accidents are “fender benders.” With a good quality, padded body harness (like the aforementioned Front Range by Ruffwear) you can use a dedicated car connection.
Mighty Paw: uses the latch bar, which is a required feature in all cars since 1999 (this is the same connection child seats anchor to). Connects with a carabiner to the harness. Mighty paw just released a new model with a cable instead of the belt if you have a chewer.
EzyDog Click: uses a male-end seatbelt tab to click into standard seatbelt receptacles. This one connects to the harness with a bolt snap. Will not work in Volvo receptacles.

These types of restraint connections must be made onto a solid body harness like the Front Range, not a walking harness like the Sense-ation. Never EVER attach to a collar (I feel like that’s a no brainer but as soon as you say that someone is like, “Hold my beer”).
Both the Safety Belt and the Click retail for about $15 USD.
Our recommendations for car restraint are, in order of safety:
1. Heavy duty crate (not wire)
2. Plastic crate
3. Car harness (Ezy Dog or Sleepypod)
4. Restraint belt (Mighty Paw or Ezy Dog) on a solid quality harness
Food Rewards
Using food to train is a fast-paced, rapid-fire activity. Try to lean towards these prerequisites:
Small: we don’t want dogs to fill up too quickly during a training session. We also don’t want to waste time waiting for them to finish large, crunchy, or messy things. We need to move through the work and maximize the number of repetitions we can get for the behavior we’re working on.
Highly palatable: keep hunger drive high by using something the dog finds motivating.
Easy to handle: you need to be able to manipulate the food when you’re using it as a lure, for targeting, and for conditioning work. Stay away from things that are overly messy, crumbly, or greasy.
The ideal model is to be able to just use kibble to train. This isn’t always ideal (and if you feed raw, we have recommendations towards the end of this chapter). A higher value training reward can make training sessions more motivating.
Pro Tip: Don’t forget to subtract whatever you use for training from your dog’s daily ration of food.
Pet Botanics Training Rewards
These are made in the U.S. (not China) and they’re relatively low-cal. These are soft enough to be broken up into halves or even thirds for working with dogs of different sizes, and they’re very easy to handle efficiently (check the guide on the following page).

Zuke’s Mini Naturals
These are also made in the U.S. and are low cal as well. They are soft like the Pet Botanics and just a little bit smaller. They tend to be a few more dollars than the Pet Botanic brand.

Stewart Pro Treats Freeze Dried Liver
In addition to using them as jackpots, you can also use these to kick up the power of regular kibble. We recommend using kibble to train at home since it’s more nutritionally balanced overall. If you toss a fist full of liver treats into a food processor, turn them into powder, and then sprinkle it over kibble, suddenly you have a supercharged kibble you can use to train with.

You Can Also Use:
Cut up log foods like Pet Botanics rolls, Happy Howie meat rolls, cooked chicken or turkey, or cold cuts.
Training Rewards for Raw Fed
Feeding your dog raw doesn’t mean there isn’t anything to use for training rewards that still fit the requirements noted earlier. Here are some suggestions for you:
Roasted meats can be cut into small pieces, usually 1/4”-1/2” across depending on the size of your dog. Cut up organ meats such as heart or kidney tend to work well since they have much more overall cohesion. Hand shredded, boiled or broiled chicken works very well, too.
Dehydrated or freeze-dried raw meats (or make your own).
For more messy mixes you may have prepared, tiny reward-sized dollops can be frozen and then used straight from the freezer for a session.
Generally, raw food has a greater chance to be messier to handle, but our friends and colleagues that raw feed just go into it knowing this is part of the game. Your mileage will vary; to each their own!
Pro Tip: Expertly Handle and Deliver Food Rewards
It seems like an unimportant thing, but how you hold the food and how you deliver food can really affect the ef- ficiency of your training.
Put it in the valley between our index and middle finger, at about the first joint. Then use the end of your thumb to trap it in place; and then cup your hand as if we’re tying to hold water.
This way, when the dog tries to get the food they press their teeth against the side of your thumb and the flat of your fingers, and their nose pushes into your hand. You will have control of their head but they won’t quite be able to get the food. When you want to deliver the food simply roll your thumb out of the way and let them take it.
A common mistake is to cover the food completely with your thumb. Your dog will try to go around the edges and you’ll lose control of their head.

Other common mistakes:
Another mistake is when people try to pinch it between the thumb and the side of the finger joint. This results in less dexterity and the dog usually gets the food when you don’t want them to.
Also, some people try to pinch it in the crook of their thumb. This offers even less control and the dog gets it when you don’t want them to. You’ll drop it a lot this way, too.
Finally, don’t hold it with your fingertips. It’s too hard to control the nose this way, and a vigorous dog (which we want in the beginning stages) will chomp the ends of your fingers.

Bait Bags
Now that you know how to choose good food rewards, and you’ve got an idea how to handle them efficiently, you’re going to need something to carry them around in. A good bait bag is essential for your reward-based training in the early stages. As with everything I recommend, I prefer streamlined products that are functional, sturdy, and stay the heck out of the way most of the time.
Leerburg Snap Open Bait Bag
Sizes: 1 options
Color: 4 options
Cost: ≈ $27 USD
Link: https://leerburg.com/736.htm
When using the belt, I can switch it around on the fly to the side I need. It also has a hinge+spring system sewn inside it so that when the bag is open, it stays open and I can reach in effortlessly. This greatly increases my draw speed as I work, whereas other bags I used years ago would collapse or get in the way.
Likewise, that spring system means when I close the bag, it stays closed. Then when I’m moving around being more active the food stays inside. Also, when I squat down, it keeps nosy dogs out of the bag!


PET N PET Dog Training Treat Pouch
Cost: ≈$12-$15 USD
This pouch is great for being able to hold extra things like poop bags (it has a special holder on the side) and other small items as it has two extra pockets, one in front and one in back.
The downside is using it in cold weather when you are wearing gloves, the inner lining can get bunched up and it can be difficult to easily grab a treat without grabbing the liner, otherwise it’s a great pouch!

Toys
When kids go out for sports, we implicitly understand similar benefits: healthy exercise, developing social skills, developing motor skills, self-control, confidence, fun, and bonding.
It is my belief that we can and should to the same with our dogs. When I play with my dogs, I don’t just want it to be mindless exercise; I don’t want it to just be a time-filler. Likewise, when they choose a toy on their own for some down-time, I want there to be things available that really satisfy them emotionally and mentally.
Thus, your dog toys should have practical, developmental benefits. Just like everything else we choose for them—from our hardware to the food we feed—the toys we use (and how we use them) should have some fore- thought and planning.
The following chapter outlines a few of my favorite toys along with some beginning suggestions to get you mov- ing in the right direction!
Pro Tip: Good Toy Organization is Where it Starts
A lot of people tend to just buy their dogs whatever toys look interesting and then leave them all over the place. I’ve heard more times than I can count: “OMG she has so many toys all over the house/back yard.”
With a little more forethought and intention, we can do much, much better for our dogs (and our sanity!).
Interactive Toys are restricted access. This means that tugs, balls, frisbees, retrieval dummies, and the like are put away when they’re not being used. You don’t want your dog destroying these things, you don’t want your dog being possessive with these toys, and you especially don’t want your dog learning how to play with these without you. What do they need you for, then? So, keep these toys put away somewhere. Take them out, play with your dog, then end the session and put them away.
PRO TIP: Interactive toys, when properly used, eventually become compelling training rewards in lieu of food!Work-To-Eat Toys are also restricted access. These include Kongs, Barnacles, Wobblers, puzzle toys, and more. These are only available while they’re being used in a Work-to-Eat project. Once your dog finishes it or abandons it, pick it up and wash it.
I’ve been to lots and lots of houses where there are Kongs all over the yard and living room, empty, sometimes covered in dirt, other times mostly unused, and even sometimes with funky rotting food in them. Let’s do better than this!Chew Toys are the only things available all of the time. These include Benebones, Nylabones, butcher bones, and any other safe toy that your dog enjoys chewing on. At any time your dog can choose a chew toy and settle down with it to self-soothe and wind down. Chewing is a passive activity that’s relaxing and emotionally satisfy- ing. Packing around chew toys can also be a behavioral pacifier, short circuiting jumping and barking for dogs that get jazzed up by people coming over.
Chewing is something you can develop and cultivate. When people say “My dog isn’t really interested in chew toys,” my answer is “Then train them to be!” More often than not, the problem is connected to having too many of all kinds of toys laying around!
Remember:
We tell our kids not to leave the sports equipment laying all over the driveway, right? So put away the inter- active toys when not in use.
We tell our kids not to leave dirty bowls and plates laying about, right? So pick up the work-to-eat toys and wash them.
However, coloring books can be left more-or-less in the open where kids can just grab on and occupy them- selves quietly, right? So leave the chew toys accessible 24-7-365.
Interactive Toy Recommendations
Leerburg Tubular Tug
Sizes: One size
Colors: 4 options
Cost: ≈$14 USD
REVIEW: I almost never leave the house without one of these. I take it to the shelter, I take it on hikes, I have a couple in the training studio...it’s just part and parcel in my training. I love teaching Tug to dogs and this is pretty much always my go-to. As always, remember to put it away when you’re done playing! This is a very rugged toy and will withstand months or even years of tug provided your dog isn’t allowed to use it as a chew toy!


Dean & Tyler Pocket Tugs
Sizes: One size
Colors: 2 options
Cost: ≈$40 USD (for the pair)
REVIEW: The Leerburg tug above is about 15” long (≈38 cm) and probably 1.5” in diamter (≈ 3.8 cm) and while it’s super for most mid-size to large dogs, the little guys need something smaller. The pocket tugs are great for this. One of them is synthetic French linen, and the other is leather. They’re each only about 8 inches long (≈20 cm) and great for the little ankle-biters. Sometimes they’re marketed as “puppy tugs” but I mainly use these with smaller breeds; they’re not just for puppies.

Pro Tip: Cut the Handles Off
A lot of tug toys come with handles on the sides. For dogs still learning tug rules, these will distract your dog and make it harder for them to learn accurate targeting. These handles also make it harder to teach Drop It during the game. If you get a good, tubular tug with handles, just cut them off. An advanced dog can do well with them, but I personally just cut them all off no matter what. Those Dean Tyler tugs above come with handles, and I already cut them off in the picture!
GoodestBoi Retrieval Dummy
Sizes: one size
Colors: 3 options
Cost: ≈$10 USD
REVIEW: In lieu of (or sometimes in addition to) tug, I also really enjoy teaching more formal retrieves to dogs. A lot of folks play “fetch” with their dogs, but it tends to be kind of a mindless back and forth. You can do a lot more devel- opmentally when you add a little bit of structure! This is a brand new product from a Germany-based company. The first several dogs I tried this with turned into a resounding success. A hidden zipper allows you to fill the dummy with training rewards. Once you pitch it and encourage your dog to bring it back, they get rewarded right away from the toy. It’s a cool way to start building the motor skill of “go get it and bring it to me.”

DogBone Firehose Bumpers
Sizes: 4 options
Colors: 3 options
Cost: ≈$10-$20 USD
REVIEW: Once you get the idea of retrieving jumpstarted, you want to get into things with a bit more ruggedness for the outdoors. There are a lot of manufacturers that make retrieval dummies, but so far my personal favorites are the ones from DogBone. They’re a good, middle-of-the-road weight, and they’re very well made. These come in four sizes to fit the dog you’re working with, and three different colors to control visual difficulty when you pitch it into cover.

Ruffwear Gourdo
Sizes: 2 options
Colors: 3 options
Cost: ≈$15 USD
REVIEW: Generally, I prefer to use retrieval dummies with my developmental fetch, but I gotta say I think the Ruffwear Gourdo is a lot of fun, too. You can pitch it for a retrieve just like regular dummy although, being rubber, the Gourdo is good for wet areas, is easier to clean (from both dirt and slobbery dogs) and it doubles as a tugger, too. It’s actually not too heavy, either, which is some- thing that’s deterred me from other similar toys. I’ve got one of these in my toy bag because sometimes it’s just the right one for the situation!

Work-to-Eat Toy Recommendations
In the wild, dogs would spend an estimated 90% of their waking hours searching for something to eat. Likewise, hunting and/or foraging has about a 70% failure rate! But Mother Nature in her wisdom has made it so that all stages of the process—regardless of outcome—are inherently stimulating and enjoyable.
Thus regular bowl-feeding deprives a dog of their principal activities: searching for and acquiring food. Instead, after eating, your dog will search for entertainment for the rest of the day. Generally, then, your dog’s recreational choices become annoying and mischievous misbehaviors.
Delivering meals as WORK-to-EAT Projects allows a dog to forage, search, dissect, and consume in a way that extends meal time and makes it highly emotionally satisfying.
PetSafe Busy Buddy Barnacles
Sizes: 3 options
Colors: 2 options
Cost: ≈$8-$15 USD
REVIEW: The Barnacle is one of my favorite hollow “Work-to-Eat”toys out there. It’s durable, and has a lot of options for how you can use it. You can stuff the insides with your dog’s meal. You can fill the grooves with a knob of something supper appetizing like wet food or peanut butter. You can even trim the little fins inside the holes (or leave them intact) to control the difficulty of the toy. Once your dog’s all done, this can go on the top rack of the dishwasher. These are much cheaper than Kongs, meaning you can have several on hand or even prepared in advance without blowing out your pet budget.
PetSafe’s Busy Buddy line also includes the Squirrel Dude which is another worthy stand in for the Kong. Kongs are great, don’t get me wrong, but they’re way overpriced and I like to have several toys on hand.

Muzzle Mat
Sizes: customizable
Colors: black
Cost: ≈$5 USD (per square)
REVIEW: This is straight up DIY, and proof that some of the best things don’t come with a picture of a dog on the packaging! At our local hardware store I just pick up a 2-ft x 3-ft Black Rectangular Indoor Anti-Fatigue Mat. The whole mat comes to about $30. It’s scored into 1-ft x 1-ft squares, and I easily cut those with a utility knife. Now, I have 6 mats I can do some forage-feeding on. These are rugged, heavy, and dishwasher safe. Just lay it down and scatter your dog’s food on it. You can even use it for wet food—just spoon it into the holes!

OTHER WORK-TO-EAT OPTIONS
There are tons and tons of options out there to crank up the enrichment value of meal times.
Hollow Toys
The Barnacle I listed above is just the one I like the best. There’s also Kong, the West Paw Qwizl, the Kruuse Buster Cube, the OurPets Atomic Treat Ball, the Ruffwear Gnawt-a-Cone, and many, many other variants, copies, and different shapes.Wobble & Rattle Toys
The PetSafe Tug-a-Jug, PetSafe Magic Mushroom, and the Kong Wobbler are probably my favorites. These all come in two or three different sizes so you can customize to fit your dog. Although, again, there are many variants available that do more or less the same kind of thing. There are even YouTube videos on making your own!Dissection D.I.Y.
Besides the Muzzle Mat I showed you on the last page, you can make foraging and dissection projects out of egg cartons, cereal boxes, toilet paper tubes, paper bags, muffin tins, boot trays...it’s almost endless what you can do with household items.
Chew Toy Recommendations
Benebones
Sizes: 5 options
Flavors: 3 options
Cost: ≈$10-$20 USD
REVIEW: Benebones are HANDS DOWN my #1 chew toy. I believe that they’re superior to Nylabones in construction, quality, and appeal to dogs. Whenever I work with a dog that needs to learn to settle down and downshift, I make Benebones part of that plan.
Benebone offers several different shapes in their assortment. In my experience, these wishbones shapes are the most appealing because dogs can manipulate them and get the protruding parts into their back teeth. I’ve seen where the other shapes worked for some dogs, but by and large I still prefer the wishbone shape.

BarkBox Super Chewer
Sizes: based on dog’s weight and age
Colors: varied every month
Cost: ≈$30 USD
REVIEW: BarkBox is a monthly subscription box that comes with chew toys, an assortment of fun treats, and either a work-to-eat toy or an interactive toy (and sometimes both!). I’ve tried several monthly boxes in the last few years. Most of them leave a lot to be desired in terms of having smart and useful items. Most of them are just fluff and junk. Even the regular BarkBox was unimpressive to me. However, I really like the Super Chewer. The toys in it are well made and interest- ing, and the treats are all U.S. made and relatively healthy. I don’t use them for training treats, but for the ol’ “once-in-a-while” gig they’re usually just right.
In the past I’ve also really liked Bullymake’s monthly box, too, but lately they keep sending chew toys without any protrusions and my dogs just don’t like it when there isn’t something to stick in their back teeth. So far the Super Chewer boxes have been a super hit every time and it’s really becoming my preferred box.

Pro Tip: Learn Your Dog’s Preferences
Chew toys are a somewhat personal thing for dogs. Most dogs like middle-of-the-road hardness where they kind of “shave” and scrape the toy with their teeth. Some dogs, though, really like something they can compress. In these cases durable rubber works great, but supervise it so they don’t swallow pieces they may chew off!
Technique is More Important Than Hardware
This article originally appeared on the Simpawtico Dog Training blog on May 15, 2014.
If you’ve spent any time around me, at my classes, or even just browsing my website you’ve probably been exposed to one of my core beliefs: “TECHNIQUE over HARDWARE.”
AS SEEN ON T.V.
A lot of folks spend a good deal of time and money hunting down bigger and better pieces of equipment to make their dogs behave. They saw a new harness in a magazine that works MIRACLES! Their friend told them about some contraption that straps to a dog that’ll turn them into a whole new pooch! A vet tech sent them to the pet store to pick up the new leash/collar/strap/cord combo thingy that’ll just do the trick!
This speaks to our pervasive “As Seen On TV” culture that all of our problems can be solved if we simply spend money on the right things. Unfortunately we don’t want to hear that we have to put work into something. We want to buy things that fix the problem for us. A special cleaner or detergent. A cool gadget. An app. Some- thing immediate. Just take my damned money so I can finally live in peace!
I’m sorry to have to tell you this: existing with another living thing is not covered in that pipe dream.
It’s just like how all of those things you wish you could change about your family or friends don’t just magically get fixed when you buy something. Your dog isn’t furniture or a kitchen appliance. It has a brain, wants, needs, and feelings.
HARDWARE IS NOT INHERENTLY BAD
Don’t get me wrong: there is a time and a place for some pieces of hardware. As much as I hate them, there are even appropriate uses of prong collars. But these are all tools to help you fix a problem, not a cure unto itself. And really that applies to any piece of hardware you get, be it a leash or even a harness.
You’ve got to learn to do it without the gadgets. Once you have solid knowledge and technique under your
belt, any of those pieces of hardware become way more effective.
Wouldn’t you expect a mechanic to know how to use her tools? Wouldn’t you want your computer repairman to know how computers work? What makes you think you’re off the hook? Shouldn’t you learn about your dog first, and then how to properly operate the tools next?
And this is where I take issue: I see well-meaning folks who love their dogs take bad info and compound it with hardware that they don’t know how to use properly.
The training collar, the shock collar’s remote, the no-pull harness, the retractable leash, even ridiculous things like cans of pennies and spray bottles (complete rub- bish, both of them)...these won’t get you where you want to be without knowing how to do it right. And as often as I harp on prong collars, my greatest gripe is that in the years I’ve been training I can count on one hand the number of times I’ve seen on one used and fit correctly on a pet dog. Even that tool would be more effective and humane if owners were better educated.
Here’s another way to look at it: you could have the greatest, most high-performance car in the world, but if you’re a crappy driver you might as well drive a Pinto.
A FALSE SENSE OF SECURITY
The problem with most of these objects is that you probably will get some improvement. Initially, you’ll see just enough of what you want so that you’ll a) keep try- ing and b) convince yourself it’s more effective than it really is. It’s like a slot machine, and we just keep pulling the lever. It’ll be just enough to hook you and you’ll use that special collar or harness forever.
Please understand, friends, that these things rarely (if ever) really fix your problem. It will just cover it up well enough for you to get by.
LEARN HOW TO DO IT FIRST, BEFORE RELYING ON GEAR
When I work with an unruly or aggressive dog, I always try to do as much as I can without the hardware. I apply technique and knowledge to come at it, not objects.
And I start establishing organic lines of communication with the dog. And I want the same for you! Your trainer’s job is to teach YOU the techniques, the timing, the motions, and the master keys like a ballet teacher or martial arts sensei. It’s a matter of the interactions between you and your dog, not as a factor of objects or things.
Spending your money on appliances and gadgets hoping that they will magically transform your dog into a good dog is ignorant and lazy. I’m sorry...you know I can’t candy-coat. No matter what, learn some technique. Find a trainer who uses positive reinforcement, who understands how dogs learn, and utilizes sound mechanics of effective technique. Find one who can coach and encourage YOU on that technique.
Then, if you REALLY need that special harness, or that prong collar you can then learn how to use it right. You’ll be able to accomplish ten times what you’d expected, and a hundred times more than what you got before!
Otherwise you’re that schmuck in the race car grinding gears in the drive thru. Don’t be that guy! We can do better!